Friday, May 30, 2014

Spam Musubi

There isn't much to say about these tasty little snacks. Just like Hawaiians, Filipinos love Spam. Never mind about the ridiculous amount of salt and the general idea that it probably isn't all that great for your health. These handy little snacks are hands down, delicious. It's a given that we will probably be eating tons of leafy greens from the garden the next few days, but that's a story for another day.

I have a catering party tomorrow and on the menu are mini Spam Musubi bites. I've been looking for a mold to make the process go a little faster and on the same hand end up with an aesthetically pleasing product. I remember my wife buying these two spring action molds for a Filipino dessert called Porvoron. The mold
ended up working nicely on our test run so tomorrow should go off without a hitch. By saying that, of course, Murphy's Law will come a knockin' and throw a mighty wrench on tomorrow... I better lock the molds up.... to be continued....

Anyway, these little guys are perfect for pass hors d'oeuvres or even just a quick fix dinner. Instead of making them bite size, just go ahead and use half a sheet of nori and pack on the rice with a huge chunk of spam and be on with it. Of course, schedule an hour appointment on the treadmill for the next day. Your heart will thank you for it. :)


Spam Musubi
Spam Musubi


Spam Musubi

1 can of Spam sliced to 6 equal pieces horizontally
2-3 cups of steamed white rice
2 tbsp of sugar
4 sheets of nori (cut 6 strips per sheet, horizontally)
3 tbsp of Furikake optional (Japanese Rice Seasoning) (I will have a recipe for that soon or you can just buy them pre-made. even wal-mart has them)

Procedure

-dust each side of the Spam with a little sugar and fry each one until the sugar becomes a glaze. set aside
-slice each piece of the Spam in to 4 equal pieces
-use whatever mold you may have at home or shape about 2 tbsp of rice 
-dust with the Furikake
-use the nori sheet to tie the rice and the Spam together like a little belt

optional sauce: Tonkatsu sauce

-1/2 cup ketchup
-2 tbsp Worcestershire Sauce
-1 tbsp brown sugar

mix well until sugar is dissolved

easy peasy. Enjoy!


Thursday, May 29, 2014

Honey Chili Fried Chicken and Mushroom

As I've grown older, I realize that food remains the book marker of the story of my life. Not so much as marking these huge, memorable moments in my life, but the small blips on the radar that make for the filler of the past 35 years. Fond stories I tell about my dad breaking down a bushel of crabs to make omelets back home in Philippines to a steaming plate of Yang Chow fried rice at a cafe and 3 in the morning after a long night of drinking with friends.

This dish reminds me of a restaurant back in Philippines we used to always go to. There wasn't anything particularly special about the restaurant or the food that they served. It was a chain restaurant that was located in pretty much every major mall. It wasn't a food court type of joint, but an actual sit down a la carte restaurant. As I tried remembering more details about the place, I came to the conclusion that it wasn't any of those details that I was reaching for. It was the family day out. We didn't have a car so it was buses, jeepneys and tricycles everywhere we went. I always remember those times every time I strap my daughter on to her booster seat now. Maybe it wasn't worth all the trouble to go to this place and have this particular fried chicken dish, but maybe a  day spent exploring Metro Manila with my family by bus isn't such a bad way to spend a Sunday afternoon. 

Honey Chili Fried Chicken and Mushroom


Honey Chili Fried Chicken and Mushroom

2 large chicken breasts cut in to bite sized cubes
2 cups all purpose flour
1/2 cup corn starch
1 tsp baking powder
2 tsp salt
1 tsp black pepper
1 beaten egg
oil for deep frying

2 cups button mushrooms quartered
1 small onion large diced
3 cloves of garlic minced
1 thumb sized ginger peeled and roughly sliced

sauce
1/2 cup Oyster sauce
1/4 cup honey
1/4 cup water
1 tsp sesame oil
1 tbsp sesame seeds
2 tbsp Sambal Oelek or Sriracha (or whatever hot sauce you have in your pantry)
all ingredients put together and stirred until well incorporated

Procedure

-mix the flour, corn starch, baking powder, salt and pepper together in a paper bag or tupperware with cover
-toss the chicken with the beaten egg and throw in the dredge mixture and shake well until all of the meat is coated well
-heat oil to 375 and fry the chicken until golden brown and crispy. 
-let the cooked chicken drain or a rack and set aside

-heat up a wok or a large skillet and sweat the onion, ginger and garlic then add the mushrooms then saute until tender
-add the chicken and toss for a minute then pour the sauce and quickly stir until all the meat is coated with the sauce

serve hot with steamed rice. Enjoy!

Honey Chili Fried Chicken and Mushroom

Saturday, May 24, 2014

The 10,000 Hour Rule

I started reading Malcolm Gladwell's Outliers: The Story of Success and I have been thinking about the 10,000 hour rule. This is the idea that practicing anything for 10,000 hours is the key to mastering it. All throughout history, there are examples of the greats in any field and the glory they have achieved. On the surface, we'd like to assume that it's the innate talent that they posses that drove them to reach the mastery of said field. A deeper look would say otherwise. The willingness to practice something for 10,000 hours, which is the equivalent of doing  something for a year and roughly 2 months straight, would speak of that person's work ethic and determination rather than his or her innate talent.

A few days ago while we were having a picnic out in Merritt Island, we met a fisherman named Steve. My aunt went over to him and asked if he was catching anything. He must have only been there a few minutes, but he already had about 20 sheepshead the size of a grown man's hand. Already full from the crab boil picnic for lunch, we decided to purchase his catch for a fraction of what it would cost at the market. The week before we attempted to fish that same spot and came up empty handed so naturally I was curious as to what bait he was using. Thinking it was some well guarded secret, I figured he'd lie to me and say chicken liver, but he was gracious enough to show me exactly where to get them.

I marveled at this 60 year old man's strength as he held that 5 gallon bucket between his knees as he picked up 20-30 pound rocks with one hand and shook them as the crabs fell into the bucket. As you can tell by the photo, he's practically half my size.....

Moving on....

While I quietly panicked in my head upon hearing him tell me that if I were to grab some bait along the shore just as he's doing, that I should look out for snakes, He tells me that he's been fishing these same waters for 45 years. This was how he brought home the proverbial bacon. 7 days a week. 365 days a year.  It was either here or some other causeway or lagoon or pier. To say that's a lot of time spent fishing is the understatement of the week. This man paid for his beach condo that he shared with his wife by fishing. Every. single. day. Talk about self sustained simple life. (on a side note, his wife is absolutely sick of eating fish.)


With a chance to be taught by a local to fish these waters, I quickly rigged up my pole and followed him to his spot. He would point at different areas in the water and tell me where exactly the fish would be, but under the bridge, right by the pillars that hold up the bridge itself was his main spot. He didn't waste time. Baited his hook and told me where to drop it, how far and when to pull. Just like that, he reeled in his first fish. Before I could even finish baiting my own hook he was already reeling in the second one. On and on he went, as if that particular spot had a cage around it that was filled with sheephead waiting to be picked off. 5 minutes later, my hook was caught on the rocks and today's lesson was essentially finished. I told him I'd see him again one of these days and would come better prepared. Walking away, I could still hear him say I got you, every time he got one.


One of these days I'll get lucky and catch me a few fish, but the inspiration I took away from that day was priceless. In this day in age where delayed gratification is a long gone dinosaur of an idea, there is still no replacing the act of putting in the work to hone your skills in order to master your craft.

Start something today. Give it a try and see how you like it. If you end up loving it, then keep doing it. Get better at it and someday master it. Then most importantly, share the knowledge. Inspire someone else to spend some time in finding their own greatness.

Tuesday, May 20, 2014

Chocolate Coffee Braised Beef

I received a basket of goodies from Newman's Own Organics and I gotta honest, there was so much stuff in there I couldn't quite wrap my head around what to use first and for what. You take in to consideration the work that they put in to developing their products, so I figure you have to at least do the products some justice and put out something that both of us would be proud of.

Using chocolate in savory dishes is not a new thing, despite of what chefs around the country would like you to think. Quite the contrary. Mexicans have been serving chocolate tinged Mole with their turkey for hundreds of years. Working as a cook in Los Angeles, I've had the privilege of going to battle with my brothers from Oaxaca. I've had the pleasure of tasting different types of Moles with some recipes going back a few generations. One of these days I'll try my hand in making a Mole, but for now, this will have to suffice. 

My wife, living most of her life in Philippines couldn't even fathom the thought of chocolates in a savory dish. It's excusable though, because I'm sure the thought of sliced avocado in sugar and powdered milk is about weird as it sounds when all your life, you've associated avocados with guacamole. 

Alas, thanks to Newman's Own Organics, I was finally given a small nudge to play with something that is new to me. I suppose that's the adventure of cooking. Venturing out of your culinary comforts to try new ingredients and cuisines can in turn teach you a little about other cultures. That's a beautiful thing if you ask me. To top it off, you end up with something delicious with your loved ones. So roll up your sleeves and hop to it.

Chocolate Coffee Braised Beef


Chocolate Coffee Braised Beef

1 lb beef chuck roughly cubed in to 1 inch pieces
1 tomato diced
1 onion diced
5 whole cloves garlic
2 bay leaves
1 tsp whole coriander seeds
2 tsp chipotle sauce (or if you really like it spicy, throw in the whole chili in there)
1 cup brewed coffee
2 cups water
1 large carrot rough chopped in to 1 inch pieces
1 lb red creamer potatoes, washed scrubbed and cut in half
1/2 cup dried Newman's Own Organic Dried Apricots rough chopped (substitute any brand of dried fruit available to you)
flour to dust the beef
salt and pepper to taste
Newman's Own Organic Olive Oil (or any olive oil you have in your pantry)
1 3.25 ounce Newman's Own Organic Super Dark Chocolate (any dark chocolate with at least 70% cocoa)


Procedure

- season the beef with salt and pepper and lightly dust with flour
- heat up a pan, add a few tablespoons of olive oil and in batches, sear off the beat until nice and brown then set aside
- add a little more olive oil then saute the garlic, onions and tomatoes in high heat for about a minute to caramelize it a little bit
- deglaze the pot with the coffee then add the browned beef, coriander seeds, bay leaves and chipotle sauce
- add the water and bring to a boil then cover and lower the fire and simmer for an hour
- then add the carrots, potatoes and apricot and simmer for another 30 minutes or until the beef is fork tender
- break up the chocolate in to smaller chunks then add to the sauce until well incorporated.

Serve with rice, pasta or tortillas. Enjoy!

for mobile phone users, please click this link: Youtube video


Saturday, May 17, 2014

Chicken Stir Fry with Mushrooms and Green Beans

The star of this dish is none other than the Green Beans because they came from our garden. It was barely enough of a harvest to balance this dish, but it's always satisfying to be able to step outside and pick fresh vegetables from the garden to cook right then and there. Talk about farm to table dreams. Someday, we will definitely get there when not just one or two components of a dish comes from within our own little farm, but every single one of them. No pesticides or synthetic fertilizers to negate the goodness that these vegetables are suppose to bring to our bodies.

A quote by Sarah Ban Breathnac states The world needs dreamers and the world needs doers, but above all, the world needs dreamers who do. Some day the maintenance of lawns will be subjugated by the nurturing of vegetable gardens. It may be an idea that won't sustain for now due to the way people's lives are now constructed, but maybe some of us can help push the idea along. That good clean, whole foods should be the absolute norm and not thought of as an elitist health fad.

So we decided to celebrate the idea and our green beans became part of a tasty stir fry.

Chicken Stir Fry with Mushrooms and Green Beans

green beans from our garden

Chicken Stir Fry with Mushrooms and Green Beans

1 chicken breast thin sliced
1 cup green beans cleaned and blanched
1 cup of any type of mushrooms sliced
1 onion large diced
1 thumb sized ginger peeled and sliced
3 cloves garlic minced

marinade

3 tbsp cornstarch
2 tbsp water
1/4 tsp baking soda (optional. works as a tenderizer)

sauce

3 tbsp Chinese rice wine
2 tbsp soy sauce
1 tbsp oyster sauce
1 tsp sesame oil
1 tbsp brown sugar
1/2 tsp sambal (or Sriracha or whatever hot sauce you have in your pantry)
pinch of white and black sesame seeds

please click this link for the video for mobile phone users:  youtube video of procedure


Thursday, May 15, 2014

Tinolang Manok sa Ampalaya (Chicken Ginger Soup with Bitter Melon)

Testing out recipes on a daily basis, especially for the blog, you tend to forget to eat healthier. Healthy food is a tough sell in any household, but now, more than ever, it is a must. I've written about the health benefits of bitter melon, but I doubt too many people can even begin to get past the bitter part of the vegetable. My wife and I love the vegetable and anything that will help keep diabetes away is a welcome staple in my diet.

Rainy days here in Florida reminds us of Philippines and what better way to enjoy the rain with some soup. Tinola, traditionally is a basic chicken soup flavored with ginger usually accompanied by papaya and water spinach. This particular recipe is a rendition coming from my wife's province. Bitter melon is widely used in dishes in the norther part of Philippines. I enjoy this vegetable as a stir fry, such as Stir Fried Bitter Melon with Shrimp, but a little less oil and cholesterol was the mission for the night and I think we did well. The bean thread noodles makes the soup a bit heartier so eating it with rice is optional......... so I thought.

Tinolang Manok sa Ampalaya (Chicken Ginger Soup with Bitter Melon)


Tinolang Manok sa Ampalaya (Chicken Ginger Soup with Bitter Melon)

1/2 lb chicken breast cut into large cubes
1 whole bitter melon seeded and sliced diagonally into 1/2 inch pieces
1 thumb sized nob of ginger smashed
 3 cloves garlic
1/2 small onion sliced thin
1 cup dried bean thread noodles
2 tbsp fish sauce (optional, you can use salt to taste)
black pepper to taste
4 cups water or chicken stock

Below is our first instructional video. Let us know how you like it! Enjoy the dish! :)


Monday, May 12, 2014

Spicy Asian Style St. Louis Ribs

In the kitchen, whether professional or home, you make do with what you have and hope for the best. I had a slab of St. Louis Ribs thawing and when you have a set picture of how you want a dish to be, sometimes you begin to ask yourself, is the juice worth the squeeze? We have an electric oven and so I figured it wasn't worth the 2 hours of low and slow cooking for 1 lonely slab of ribs. It's probably illegal in some Southern States to even mention this but the pressure cooker was calling and what the oven would take 2 hours to do, the pressure cooker was up to the challenge in doing it in less than 20 minutes. If the barbecue purist hasn't passed out at the thought of pressure cooked ribs, well he or she should brace themselves. I didn't even have a charcoal grill to finish them off at. All I had at the moment was a Korean style stove top grill to get the job done. That's cooking in a nutshell, though. With the millions of recipes floating around there telling you how make a particular dish, you aren't always going to have all the ingredients in your pantry or the equipment. The important thing is being able to improvise and just letting your creativity flow. Learn to trust yourself in the kitchen and make sure to go easy on the salt. Everything else you can adjust.

Spicy Asian Style St. Louis Ribs


Spicy Asian Style St. Louis Ribs

1 slab of St Louis cut ribs (or a rack of Baby Back ribs)
5 cloves of garlic minced
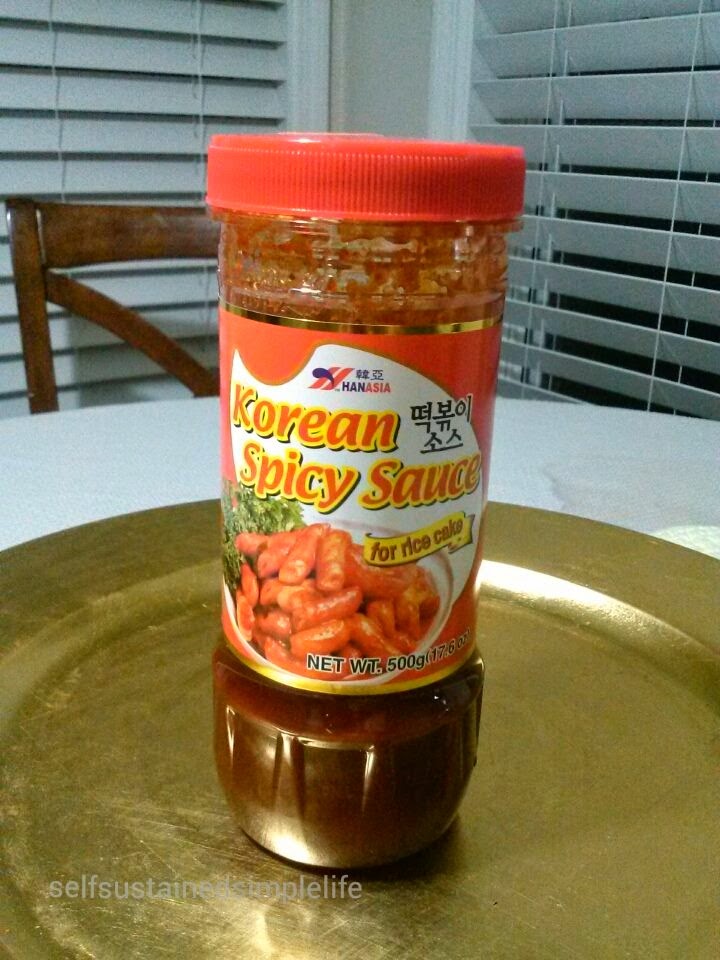
4 tbsp of Spicy Korean Sauce (gochujang,  pictured below)
2 tbsp soy sauce
1/2 tsp sesame oil
3 tbsp honey
2 tbsp Chinese rice wine or dry sherry


Procedure

-mix all the ingredients for the marinade. cut the slab in half and place in a freezer bag with the marinade for at least 2 hours. overnight preferred.
-remove the ribs from the marinade making. strain the marinade removing the garlic from it. set aside for basting.
-pressure cook for 15 to 20 minutes (closer to 15 than beyond 20 or the meat will have completely fallen of the bone.
-fire up the grill or in my case the stove top grill and brown the ribs make sure to baste it to give it a nice sweet caramelized glaze

Enjoy!

Thursday, May 8, 2014

Organic Mini Shells in Creamy Bacon Chipotle Sauce

When we started our little garden here, we decided it would be organic. No chemical fertilizers or pesticides. Compost that we make ourselves will be the only fertilizer that the plants get. It's a matter of paying attention to what we put in our bodies. I don't think it's about throwing everything out of the fridge, freezer and pantry and replacing everything with organic products. Better choices in what we eat is our goal for now.

Through some online research, we ran in to Eden Organic Pasta Company. The first thing that stood out about the company is that they are located in Detroit, MI. The big corporations have been long gone, but since buying the this factory in 1982 from the Schmidt Noodle Company, they remained standing and thriving, providing jobs where it is most needed. The company's motto is "people who care" and it seems fitting.

We contacted EOPC and they sent us some samples and this is what we came up with. I have to be honest that I initially had planned on making a lighter healthy salad with the pasta but this time, bacon came calling, hence a slightly richer dish. I made sure to load up on the vegetables so it wasn't all bad. I used to not be a huge fan of whole grain anything but the past few years, we as a family, have acquired the taste for it. More important than the taste though is that whole grain means more heart healthy fiber.

Organic Mini Shells in Creamy Bacon Chipotle Sause

Organic Mini Shells in Creamy Bacon Chipotle Sauce

1 cup cooked EOPC Small Vegetables Shells
2 ounces bacon
1/2 cup cooked frozen peas
1/2 cup whole kernel corn
1 clove garlic sliced
1/2 small onion diced
1 tsp chipotle sauce (adjust according to desired spiciness)
2 tbsp Mexican crema or sour cream
1 tbsp rough chopped fresh basil
few tbsp of reserved pasta cooking liquid


Procedure

-cook pasta according to directions on box. (make sure to always salt the water when cooking pasta)
-saute the bacon but not to crispy
-then add the garlic and onions and saute until fragrant
-then add the peas and corn and saute for another minute
-turn the fire down to medium high then add the crema and chipotle
-use the pasta water to thin out the sauce a bit. a few tablespoons of the liquid should do
-toss the basil and give it a quick stir
-shave a bit of Pecorino Romano for a nice saltiness and serve immediately

Enjoy!

Wednesday, May 7, 2014

Baked Chicken Buns

We have some family that came over from the U.K. and today, along with my Mom, went on a road trip to Canada. A whole day of driving and filling up on junk fast food isn't the way to go so we decided to make a hearty snack for them to munch on. Well, from the last update, all the buns were gone before they even crossed over to Virginia. Note to us: double the recipe for the next road trip.

Growing up, one of my favorite snacks were steamed buns called Siopao which is basically the cousin of the Chinese Dim Sum staple, Char Siu Bao. This one is the baked version of this delicious snack. The steamed buns are usually stuffed with a savory sweet pork braise but the request from mom was to make it with chicken so that's what we did. These buns turned out great and the best part is that the recipe for the stuffing can be as versatile as you want it to be. Omit some of the ingredients you don't want and substitute ones that you love.

Baked Chicken Buns


Click below for the Sesame Buns Recipe

Sesame Buns Recipe

Chicken filling Ingredients

1 lb chicken breast boiled and shredded
1/2 cup frozen peas and carrots parboiled
1/2 cup diced russet potato parboiled
1/4 cup raisins
3 cloves garlic minced
3 tbsp Oyster sauce
2 tbsp soy sauce
2 tbsp rice wine or dry sherry
pepper to taste

Procedure
-sweat the garlic then add the chicken, peas and carrots, potatoes and raisins and saute for 5 minutes or until the chicken has a bit of color
-add the rice wine, soy sauce and Oyster sauce and pepper then saute for another 5 minutes then transfer to a tray to cool the mixture for stuffing

-following the instructions for the buns, once the dough has been kneaded and has rested for 10 minutes, divide the dough in to 12 equal pieces stuff them each with about 2 tbsp of the Chicken filling. Pinch the bottom of the dough to seal in the filling.
-once they are all stuffed, place them each in a cupcake liner and proof until the dough has doubled in size. about 45 minutes to 1 hour
-preheat oven to 375 then egg wash the tops of the buns and bake for 18 to 20 minutes, until golden brown.


Enjoy!


Tuesday, May 6, 2014

Ground Beef Omelette (Tortang Giniling)

Torta is the Filipino version of the omelette and it is my absolute favorite dish. Ever. The most common of these omelettes would be the Giniling or ground pork/beef and Talong or Eggplant. However, we pretty much make Tortas out of everything from corned beef to crab. I remember when I was young, my mom would buy a huge bag of crabs and my Dad would steam them and one by one, pick the meat for the sole purpose of making the omelette. The patience of this man when it came to preparing food for the family is unparalleled. The end product though was rich, decadent and heavenly. Another story I remember from my childhood was when my grandma would make raisins from grapes that were picked from a friend's farm in Bakersfield, Ca and send them back home to Philippines. My dad must have added raisins to everything he cooked and Tortas were usually the recipients of those raisins, which I admit, really helped round out the dish. This particular recipe will have raisins it it, but as usual, is optional.


Ground Beef Omelette (Tortang Giniling)
Ground Beef Omelette

1 lb ground beef or pork
1/2 an onion diced
3 cloves of garlic
1/2 cup of frozen cooked peas
1/4 cup of raisins
1/4 cup of tomato ketchup
2 tbsp soy sauce
1 tsp sesame oil
2 tbsp all purpose flour
3 tbsp sliced green onions
4 large eggs

-brown the beef or pork then drain the fat
-saute the onions and garlic until fragrant then add the browned meat
-add the peas and raisins and saute on high for a minute or so then add the ketchup
-once the ketchup has caramelized a bit, add the soy sauce, mix for another minute then set aside to cool

-once the meat has cooled, crack the 4 eggs in to the mixture, add the green onions, sesame oil and flour then mix thoroughly,
-heat a well oiled pan and pan fry 3 tbsp sized patties until both sides have a nice crust.

Enjoy!
Ground Beef Omelette (Tortang Giniling)


Friday, May 2, 2014

Mung Bean Soup (Ginisang Munggo)

This is classic Filipino rainy day fare and as it stands, it has been raining here in Florida for 4 days now. Coming from California, though, I can't complain. It could be our imagination but rain water seems to make the vegetable garden grow faster as compared to watering it.

Mung Bean Soup in Philippines is typically not eaten by itself, but instead as a vegetable side dish accompanied by steamed rice and fried fish. This particular recipe has pork in it but you can substitute shrimp or even make it vegetarian and add mushrooms instead and more leafy greens.

Mung Beans are in the legume family so right off the bat, you know it is high in fiber, low in saturated fat and contains no cholesterol. They are also high in vitamins and minerals such as protein, vitamin C, folic acid, iron and zinc to name a few. Mung Beans are high in purines though so if you suffer from gout, moderation is key.

Mung Bean Soup ( Ginisang Munggo)


Mung Bean Soup (GinisangMunggo)

1 pound dried Mung Beans (munggo)
1 big sliced tomato
1 small onion halved and thin sliced
7 cloves garlic minced
1 pork cube
1 lb pork shoulder or belly medium diced
1 Anaheim chile
thumb size ginger
1 bunch spinach or any leafy greens you like
20 each squash blossoms
8 cups of water
salt or fish sauce to taste


Procedure

-soak the beans overnight
-in a large pot, boil the beans for an hour or until tender
-once tender, turn the fire on low. stir occasionally to prevent from  the beans from sticking to the pan
-on a separate pan, brown the pork and once golden, add the garlic, onions and tomato and sweat
-once the garlic, onions and tomato have softened, add it back to the pot of beans
-add the pork cubes and the fish sauce and simmer until the pork is tender. about 30 minutes
-depending on how thick you want the soup, you may choose to add water to think it out
-to finish, add the spinach and squash blossoms

serve hot and Enjoy!


Squash Blossoms from our garden

This Kabocha squash grew from the seeds that we threw in the compost bin. It was a small plot meant for the Okra but since the squash started growing already, we just decided to keep it. The jury is still out on weather it will actually grow some squash. So while we're waiting, we decided to go ahead and harvest some of the male blossoms to mix in to our Mung bean soup. The delicate blossoms do not pack a lot of calories, but they are rich in calcium, iron and vitamins C and A. Well we just wanted to show how we prepped the blossoms for soup. Hopefully we can have more from the plant and maybe stuff them in the future.

squash blossom

our squash

First off, how to choose the male from the female. 

male
female

How to prepare the squash blossoms


1. Remove the sepal

2. Remove the first layer of the stem

3. Remove the anther

4. Wash